vSphere Availability Basics – Storage vMotion

This is the second in a series of posts discussing about VMware vSphere Availability features, how do they work and what are their requirements.
Please keep in mind, the intended audience for this posts are Sysadmins that want to know a little more about vSphere. If you have been working with VMware products for a while you might find this post kind of boring.

In my last post of the series I spoke about vSphere vMotion but that’s not the only way of migrating VMs arround in VMware environments.
I would like to discuss a few of them.

Storage vMotion

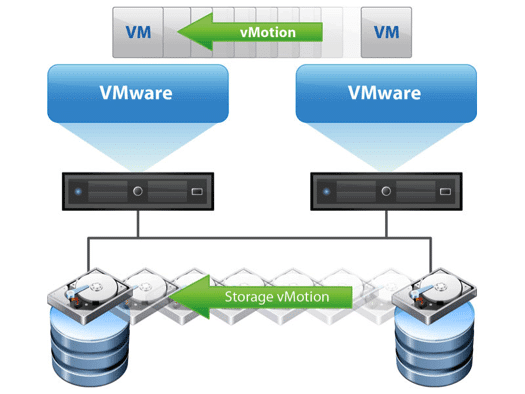
Storage vMotion was introduced in VMware Infrastructure (ESXi 3.5) and it is a feature that allows administrators to move Virtual Machines across different datastores without powering off a virtual machine.

Compatibilidad de Storage vMotion en VMware vSAN

Some of it’s key features are:
– Workload migration across different physical LUN’s.
– IOPS load balancing (With sDRS Datastore clusters).
– Storage Capactiy Management.
– The ability to perform maintenance on phyisical storage without downtime.

How Does it work?
Before I explain that, please take a look at this post regarding what files compose a virtual machine.
The process is the following

  1. The user selects a VM to be migrated and a destination datastore. (Thus defining source and destination datastores and files to be migrated).
  2. VM folder is copied to the destination datastore. (That includes all VM files but VMDK’s)
  3. Once all files are copied a “shadow VM” is started at the destination DS and it’s idled waiting for VM disk file(s) to finish copying.
  4. During the disk file transfer all changes to the files are tracked with changed block tracking (CBT).
  5. svMotion iteratively repeats the CBT process during data transfer.
  6. Once the ammount of outstanding blocks is small enough, svMotion invokes a FSR (Fast Suspend and Resume) similar to the stun on vMotion. To transfer the running VM to the idle “shadow VM”
  7. After FSR finishes files on the source datastore are deleted and space is reclaimed.

Considerations:

  • Storage vMotion can be used to rename VM folders and files on datastores.
  • It can also be used to change VM disk provisioning.
  • Before the svMotion process is initiated a target datastore capacity check is done, so you can’t migrate a VM in a full datastore.
  • svMotion is “storage agnostic” meaning it can work with anything that can provide a VMware datastore. (iSCSI, FCoE, vSAN, NFS, NAS, etc)
  • svMotion might cause issues on IO intensive applications such as databases. Please keep that in mind.
  • The max concurrent svMotion migrations is 16, nevertheless doing this can cause performance degradation on the storage array.
  • While vMotion requires a dedicated vmkernel TCP/IP stack for traffic. Storage vMotion migrates data two ways: over FC switches in case you are using Fiber Channel or using Management or Provissioning interfaces.

Requirements and limitations:

  • You need vCenter to do a storage vMotion
  • ESXi host in which the VM is running must have access to source and destination datastores.
  • ESXi on which the virtual machine is running must have at least Standard licenses.
  • Storage vMotion during VMware tools installation is not supported.
  • VM disks must be in persistent mode. If you are using RDM’s you can migrate the mapping file if it is phyiscal or virutal (if it is virtual you can change it’s provisioning) but not the data.

¿Cómo preparar el VCP-Data Center Virtualization 2020?

Después de más de un año sin rendir certificaciones me decidí a ponerme al día y prepararme para el VCIX-DCV.
Lamentablemente, por los cambios en las políticas de certificación de VMware me di cuenta que mi VCP-DCV6 estaba vencido y no iba a servir.

Al tener una certificación VCP-DCV6, no me era necesario rendir el examen vSphere 6.7 Foundations ni asistir a ningún curso. Por lo que directamente agendé el examen delta de vSphere 6.7. Con esto ya tenía una fecha limite, a partir de eso empecé a trabajar.

Lo primero que hice fue descargar la guía de del examen. En base a esa guía separé los temas en 3 “pilas”: Lo sé, no lo sé, hace falta un repaso. Entonces, por ejemplo: SIOC y NIOC entraron en la pila de lo sé, Fault Tolerance entró en la pila de repaso y temas como vCenter HA o VM encryption en la pila de no lo sé. Siendo la ultima pila la de mayor prioridad.

Desde la documentación oficial de VMware leí la teoría para cada tema en las pilas de repaso y no lo sé, también aprovechando la oferta de VMware Learning Zone gratis por seis meses elegí ver los videos de Exam Prep (hay uno para el foundations si tuvieras que prepararlo), hay un video por cada objetivo.
Entonces, por ejemplo, Para el objetivo 1.2 – Identify vCenter high availability (HA) requirements leí todo lo referente a vCenter HA hasta estar seguro de que lo había entendido y después me vi el video relacionado del Exam Prep donde un instructor te da tips del estilo de:
¿En qué se diferencian vCenter HA y vSphere HA? ¿Cuántos componentes tiene? ¿Cuáles son los requisitos?


El día del examen rendí remoto con el modo proctored de Pearson Vue (en otro post te cuento la experiencia). El examen son 40 preguntas multiple choice y es en inglés, tenes 90 minutos para rendirlo (la página dice 75, pero te dan unos minutos extra por no ser un país donde el inglés es el idioma oficial). Por referencias de conocidos, el nivel de inglés puede afectar tu performance en el examen. Personalmente no me pareció dificil, muchas de las preguntas vienen desde vSphere 6.0 y al tener experiencia con la solución salen fácil. Una vez terminas con las preguntas podes revisarlas todas o directamente ir a la devolución.
Al temrinar el examen sabes la nota, yo me saque 462/500 y la nota minima para aprobar es 300, también te podes imprimir el resultado. Más o menos a las 24 horas VMware me mandó el badge de la certificación mediante YourAcclaim.

VMware Certified Professional - Data Center Virtualization 2020

En esta crónica te conté mi forma de preparar esta certificación, que en mi caso puntual ya había rendido antes y es un producto con el que tengo experiencia. Como siempre digo, es mi forma de hacer las cosas, no quiere decir que sea la única, simplemente es la que a mi me funciona.

Gracias por leer
Por favor contame que te pareció el articulo.

Nacho

Estimado Recruiter…

En mi mente siempre prima el ayudar al pójimo en cualquier circunstancia, si por cederte 10 o 15 minutos te ayudo con tu trabajo, bienvenido sea.
Por eso es que siempre, incluso cuando no estoy buscando trabajo (como es este caso) me tomo un ratito para escuchar las propuestas laborales que me llegan o aunque sea responder los mails (Siempre aclarando que no estoy interesado) . Sea por ayudar, por cortesía, por simple curiosidad o para ver como está el mercado.

Te cuento una historia:
Hace una semana me acercaron una oferta que no me resultaba tentadora, ni me interesaba demasiado, (ya que estoy verdaderamente contento con mi trabajo actual). Desde una consultora de RRHH que vuelta a vuelta me contacta con busquedas que no dan con mi perfil. Como esta vez más o menos le pegaron decidí escuchar la propuesta y agendar una call.

El entrevistador se conectó 10 minutos tarde a la call, y durante la call sólo preguntó cosas que estan en mi CV (y linkedin) por ejemplo: ¿qué tecnologías manejo?, ¿dónde trabajo?, ¿donde trabajé?, etc.
Al terminar esta “entrevista” que duró unos 10 o 15 minutos, me comentó que no tenía posiciones para mi. Y me dio las gracias por los datos que cargó en el sistema y que seguíamos en contacto.

Esto me lleva a pensar que somos todos profesionales y nuestro tiempo (si, incluso en cuarentena) vale.
A los entrevistados muchas veces se nos “evalúa” por la puntualidad, presentación y por supuesto los requisitos técnicos.
Sin embargo a vos muchas veces no podemos darte un feedback.
Por favor, ponete en nuestro lugar, no pedimos demasiado:
– Lee el CV (que nos lleva horas mantenerlo actualizado y presentable) y tratar de entenderlo.
– Si no llegás al horario pautado, mandame un mensaje que no me voy a enojar.
– No me hagas perder el tiempo.
– Tené en claro que buscas.
Suena loco tener que pedir estas cosas hoy en día, ¿no?

No es la primera vez que pasa algo así, y creo que la mayoría de la gente de IT pasó por una situación similar.
También está bueno aclarar que por cada desprolijo de estos, hay personas serias que hacen su trabajo con dedicación y compromiso. Gracias a ellos.


Si llegaste hasta acá. Gracias por leerme.
Comentame que te pareció.

vSphere Availability Basics – vMotion

This is the first of a series of technical posts speaking about vSphere Availability.
The intended audience for this is people that might have some experience with VMware, admins that have inherited a solution or such.
Please note, if you are an experienced vSphere Admin you might find this reading kind of boring or easy.

Throughout my years in virtualization support I’ve noticed that some admins that have inherited vSphere Clusters or some App teams whose VMs failed over needed a detailed explanation of how availability features of vSphere work.

vMotion

Let’s admit it, downtime in IT is a bad word. Years ago if you had to do a planned maintenance task such as upgrading firmware or upgrading a host you would have to schedule a change window, most companies avoid this kind of changes since applications can’t (or don’t want to) take downtime.
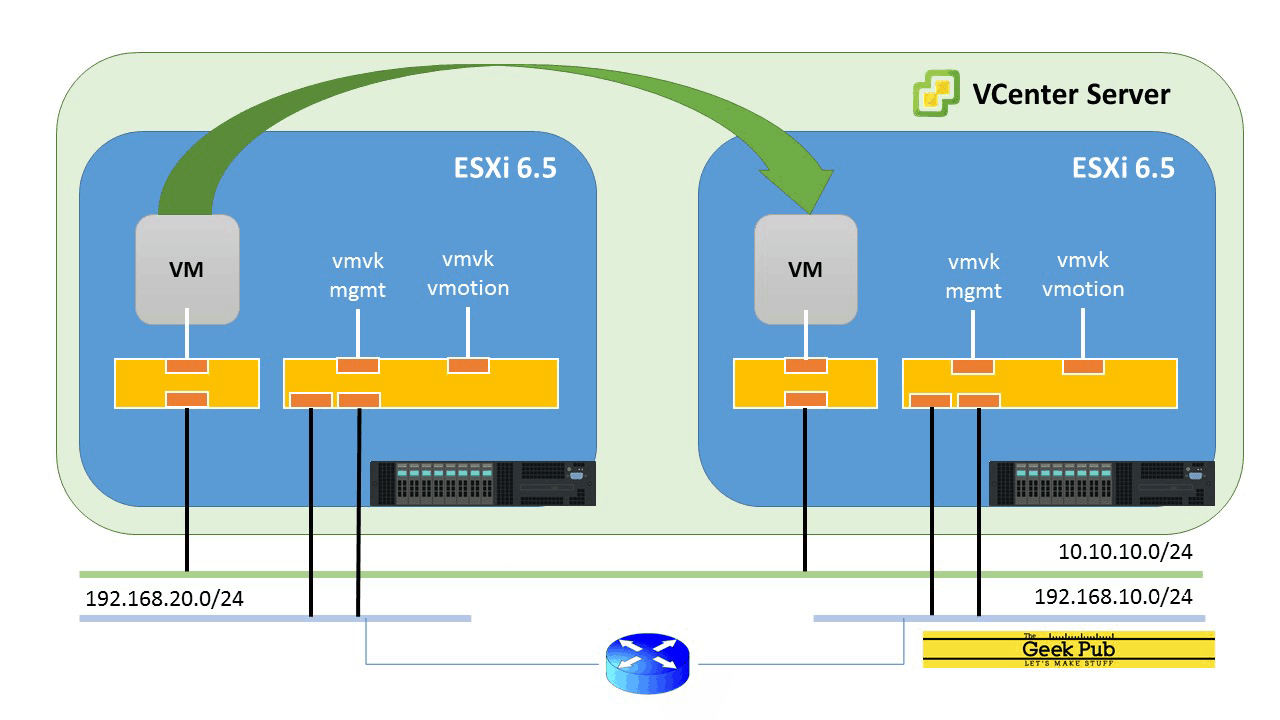
The main purpose of vMotion is to allow you to migrate your VMs from on ESXi host to another without any interruption to the guest operating system or application. This is what we call a live migration. This process allows IT administrators to perform maintenance on Physical hardware without having to take downtime.

How VMotion Works! (VMotion Explained) - The Geek Pub
Thanks Geek Pub for the image!

How does it work?
Note: this is a high level summary of what happens when you trigger a vMotion. If you want a detailed version please visit this link

When a vMotion request is issued the vCenter Server will perform a compatibility check in which it will validate the following:
– Network communication over vMotion network between source and destination host.
– Access to a shared datastore between source and destination esxi host.
– Is the portgroup created on the destination host?
– Does destination host have the same CPU family and level as source host?

Once all compatibility checks are passed vCenter issues a migration specification to both Source and Destination ESXi that includes:

-The VM that is being migrated
– Virtual Machine configuration (vHardware, settings, etc)
– Source ESXi host
– Destination ESXi host
– vMotion network details.By now the vMotion process should be are arround 22% on the recent tasks process, the VM in the source host will continue funcioning normally.
At this point a copy of all memory pages and vCPU data will begin in the background generating a “shadow VM” on the destinaton host.
Once Memory pages and vCPU pages are finally copied source virtual machine will be Shut Down and the destination VM will be Powered On but boot process will be directed to the copied memory pages.

(Please note data on vDisks will not be migrated on a normal vMotion since the data disks remain on the datastore and it remains unaltered. Vitual disks can be migrated on a storage vMotion. I will cover it on a future post).

Considerations

– Since the moment vMotion is triggered you cannot edit the virtual machine settings. This is a protection mechanism to avoid VMs becoming corrupt.
– At the moment of VM Switchover you might lose up to 3 pings, but not more than that.
– VMs with passtrough devices (Like RAW Device Mappings, Direct Path IO, and such) lose vMotion capabilites. This is because it is not possible to share those devices accross ESXi hosts.
– VMs with operations in progress like snapshots, backups, hang settings can’t be migrated.
– VMs with ISOs mounted will fail to vMotion (check KB https://kb.vmware.com/s/article/2148813)
– VMs with VMware Tools upgrade process in progress will fail to vMotion.
– vMotion will not cover you in a disaster scenario. For that purpose we have vSPhere HA and Fault tolerance (I will speak about them in future posts)

Requirements

– Shared storage access both on source and destination hosts (SAN, NAS, FC, FCoE)
– A VMkernel port for vMotion on each host (if you are using vSphere Standard Switches please make sure to keep the same name across all hosts)

Recommendations

Use the same subnet for vMotion across all hosts
– vMotion requires at least 250 MBps dedicated troghput for vMotion, more troughput ensures quicker migrations.

For further information please check: https://docs.vmware.com/en/VMware-vSphere/7.0/com.vmware.vsphere.vcenterhost.doc/GUID-3B41119A-1276-404B-8BFB-A32409052449.html

¿Does vMotion cause issues?

vMotion is an excelent tool that has revolutionized the IT market. It helps vSphere and Cloud admins avoid planned maintenance on a daily basis. In a Large size company vMotions happen thousands of times a day without causing any issues.

While there most of the applications in the market (I would say 95%) won’t notice vMotion. Some extemely latency sensitive apps will experience issues when the mgiration happens. For those cases please check this.

About Availability:

The main objective of all the products we will discuss in this series of posts is to provide Business Continuity, either it is to avoid downtime during planned maintenance, minimize (or avoid) downtime during hardware failures or keep business critical applications safe in case any disaster occurs.
None of this products will do the trick if your vSphere design does not take redundancy into consideration (NICs, PSUs, Shared Storage, using multipathing and such)
In addition to that you must be prepared for the lightning to strike and have a Disaster Recovery Plan and test it frequently.

Cómo sacar el VM Instance UUID – PowerCLI

Buenas, otra vez por acá.
Estoy trabajando en un proyecto que requiere migrar máquinas virtuales entre distintos vCenters.
La inteligencia del producto solo tiene un par de inputs: VM Name, UUID, y Sistema operativo.
Todo se puede sacar de un RVTools, ¿no? Error.

Después de leer un poco entendí que RVTools solo trae el BIOS UUID de la VM (que no es único) mientras que este script nos pide el Instance UUID.
Como no tenía forma facil de sacarlo más que con PowerCli el amigo Eric Cano me ayudó a armar el siguiente script de PowerCLI

Get-VM | Get-View -Property @("Name", "Config.InstanceUuid") | Select -Property Name,@{N="UUID";E={$_.Config.InstanceUuid}} | Export-CSV -Path ./VM-UUID.CSV

Espero les haya servido