ESXiArgs, all you need to know.

I’m not a cybersecurity expert, but I’ve been working for a CyberSec company for quite some time and after so many discussions with the Information Security folk a few things start sticking to you. This is the first post I will do focusing on security, but hopefully not the last.

Ransomware is not recent news, it’s been laying around for a couple of years.
Particularly WannaCry kept many colleagues up all night in 2017.
If anyone doesn’t know what Ransomware is yet, let’s explain it with this simple analogy:

Photo:  Westend61 / Daniel Simon

You leave your bike on the street and some thug comes in and instead of taking it home puts a lock and demands a payment (ransom) for the key.
Now, the bike is your data and the lock is an advanced encryption algorithm.

Now, as I mentioned in previous posts this blog primarily focuses on VMware products, and for many years the primary target for ransomware attacks was Windows and VMware was, fortunately, kept to a side.
With the evolution of the Ransomware industry, yes Cybercrime is an industry, Ransomware started affecting not only windows but other operating systems. And that’s where ESXiArgs comes into the picture.
Disclaimer: it’s not the first nor the last ransomware to affect ESXi, it’s just the latest one.

What is ESXiArgs?
ESXiArgs is a Ransomware campaign targeting publicly available ESXi hosts.
It is believed that it’s leveraging one of the following vulnerabilities
CVE-2022-31699, CVE-2021-21995, CVE-2021-21974, CVE-2020-3992, and CVE-2019-5544. But still, the final vulnerability is not yet confirmed.

For a deep dive into how the attack works:
https://www.trustedsec.com/blog/esxiargs-what-you-need-to-know-and-how-to-protect-your-data/

What is OpenSLP?
OpenSLP is an open-source framework for networking applications to discover the existence, location, and configuration of services in enterprise networks, which ESXi client applications use to resolve network addresses and hosts.


What ESXi versions are affected?
According to the official documentation:


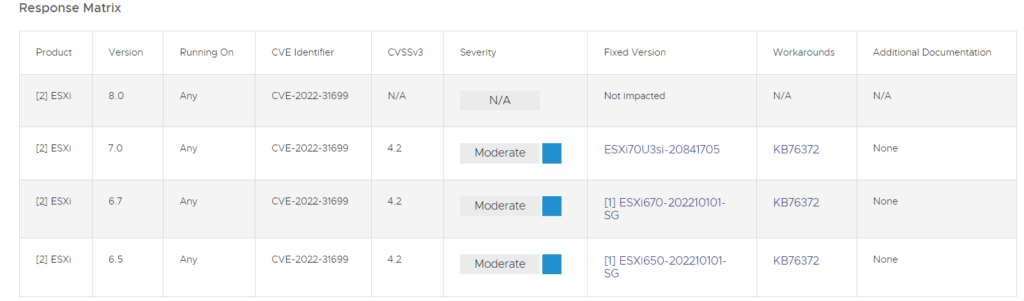
Source: https://www.vmware.com/security/advisories/VMSA-2022-0030.html

It’s important to note that most of the affected hosts were reported to be outdated versions of ESXi 6.5 and 6.7.

Is there any workaround available?
Yes, you can disable the SLP service as shown in this KB
Please note, disabling SLP service doesn’t require a reboot but may affect how CIM interacts with your VMs and third-party monitoring solutions might be impacted.

Is there any way to recover?
The US Cybersecurity and Infrastructure Security Agency (CISA) has published this github script with detailed instructions on how to recover.

Remember: Paying for Ransomware is never an option.

Can I block the SLP port on the firewall?
Yes, you can, as a compensatory control.
That’s not a full mitigation.

Is there any official comment from VMware?
VMware Official ESXiArgs FAQ page
VMware Security Response Center has also made its official statement.

Closing comments:
While researching for this blog post I came across a few interesting factors:

1. A cloud provider in France reported having 2000 ESXi hosts affected by this vulnerability. All the hosts were publicly available on the internet.

2. All of the affected hosts are unpatched. And most of them are end-of-life.

How can this be improved?
Don’t expose your servers to the internet if it’s not required. vCenter and ESXi hosts are never required to be exposed to the internet.
But Nacho I need them to… No, you don’t.

  1. Keep the servers up to date:
    This doesn’t only apply to VMware, ESXi or vCenter. This is the most basic part of running IT operations to keep your organization secure.

    I think of the usual patching as going to the doctor:
    • Some people go to the doctor often and get checked. Even if they are feeling perfectly fine. These are the more mature organizations that have reached a level of proactiveness and automation that allows them to.
    • Some people go to the doctor when they have some pain, they get some medications and forget about their doctor.
    This is probably the vast major group of organizations, both big and small that for a variety of reasons don’t want, don’t know, or can’t afford the operational cost of patching.
    • There is also a third group of people that never go to the doctor, and when they visit the doctor is too late.
    These people are just wrong.
  2. Patching vSphere has never been easier, I’m patching my hosts as I write this, to be honest, vSphere Lifecycle Manager (a tool included in your vCenter license) makes it super easy to patch and upgrade your ESXi hosts.
  3. Scan your environment for vulnerabilities:
    Organizations that are mature in the cybersecurity field usually have a Vulnerability Scanning tool running regularly.
    These tools often give a report of the vulnerabilities in the system and even tell you what is the suggested version and how to mitigate them.
    There are many options both open-source and paid.
    Based on my experience I would recommend Tenable or Nessus.
    Another option would be to hire a company or consultant that provides Red Team services.
  4. Subscribe to VMware Security Advisories
    It’s a newsletter that sends you updates on new vulnerabilities, it’s usually a 2 minute read and from there you can notify your team and your organization to properly patch and update.

Error “The vSphere Distributed Switch configuration on some hosts differs from that on the vCenter server” – VCF 3.9

Las últimas semanas del año pasado encontramos un error raro en nuestros vSphere Distributed Switches, aparecían alertados con el error “The vSphere Distributed Switch configuration on some hosts differs from that on the vCenter server”. Comúnmente cuando  haces click en el botón rectify se resuelve.
Acá no pasaba nada.
Actualmente estamos usando VCF 3.9 (vSphere 6.7 + NSX 6.4.6 + vSAN 6.7)
Los pasos a seguir para resolver este problema son estos:

  1. Poner el host en Maintenance Mode:
    Es importante seleccionar la opción “Evacuate all data”, ya que vamos a sacar el host del cluster).  Esto va a tardar un rato ya que tiene que Evacuar todos los objetos de vSAN.
  2. Poner DRS en Manual:
    Hosts and clusters → Click sobre el cluster → Configure → vSphere DRS → Edit  → Automation level: Manual.
  3. Sacar una vNIC del vDS:
    Hosts and clusters Click sobre el host → Configure → Networking → Virtual Switches → Manage Physical Adapters → Seleccionamos un Uplink y hacemos click en la X →Ok.
  4. Crear un vSphere Standard Switch (vSS):
    Hosts and clusters → Click sobre el host → Configure → Networking → Virtual Switches → Add Networking → Virtual Machine portgroup for a standard switch → New Standard Switch → Asignamos los uplinks el uplink del punto anterior.  → Creamos un portgroup (Por Defecto: VM Network) → Finish.
  5. Migrar los VMkernels del host (Management, vMotion y vSAN):
    Hosts and clusters → Click sobre el host → Configure → Networking → Virtual Switches → Click sobre el vSS (vSwitch0 en mi caso) → Click sobre los tres puntos … → Migrate VMkernel Adapter → Seleccionamos el VMkernel de Management y hacemos click en next y finish.
    (Repetimos con los VMkernel de vMotion y vSAN).
  6. Sacar la otra vNIC del vDS:
    Hosts and clusters → Click sobre el host → Configure → Networking → Virtual Switches → Manage Phyisical Adapters → Seleccionamos un Uplink y hacemos click en la X → Ok.
    (Vamos a tener que repetir por cada NIC que tenga el host, es decir si el vDS tiene 6 nics, hay que sacar las 6.)
  7. Agregar la segunda vNIC al vSS. (opcional):
    Hosts and clusters → Click sobre el host → Configure → Networking → Virtual Switches → Manage Phyisical Adapters → Hacemos click en el + verde y agregamos el uplink libre como activo o standby.  (Según corresponda).
  8. Sacar el host del cluster:
    Esto lo haces arrastrando el host fuera del cluster (al objeto DC por ejemplo).
    Es importante esperar a que terminen las tareas de reconfigure vSAN y Uninstall (NSX VIB).
  9. Desconectar el host:
    Hosts and clusters → Click  derecho sobre el host → Connection → Disconnect
    Este paso lo hacemos para que no de errores de objetos en uso y nos deje remover el host sin problemas. (Por ejemplo esta KB)
  10. Sacamos el host del vDS:
    Hosts and clusters → Click  derecho sobre el host → Remove from inventory.
  11. Agregar el host al inventario:
    Hosts and clusters → Seleccionamos el objeto Datacenter → Add host.
    Es importante no hacer esto sobre el objeto cluster, porque va a configurar vSAN y NSX antes de tiempo.
  12. Agregar el host al vDS y Migrar los VMkernels:
    Networking → Click derecho sobre el vDS → Add hosts → + New hosts… → En la parte de Manage Physical adapters seleccionamos el uno de los uplinks para el vDS → En la parte de Manage VMkernel Adapters Migramos los portgroups de Management, vSAN y vMotion (podemos hacer todo en un solo click) → En la parte de Migrate VM Networking no hacemos nada → Finish.
  13. Agregar uplinks adicionales:
    Si el host tenía 2 o más uplinks tenemos que dejarlo como estaba antes.
    Hosts and clusters → Click sobre el host → Configure → Networking → Virtual Switches → Manage Physical Adapters → Hacemos click en el + verde y agregamos el uplink libre como activo o standby (según corresponda).
  14. Agregar el host al cluster:
    Simplemente arrastrar el host al cluster en el que estaba.
    Esperar que terminen las tareas de configure vSAN e Install (NSX VIB).
  15. Verificar vSAN:
    Verificar desde el vSAN rvc console que el host sea miembro del cluster.
  16. Verificar NSX:
    Verificar desde el NSX manager que el host esté instalado y no haya problemas de comunicación.
    Cómo se está instalando la VIB puede tardar unos 10 minutos en refrescarse.

…And Kubernetes for All

Esta semana fue la edición 2020 del VMworld y hubo una palabra que se repitió más que nada: Kubernetes. El año pasado VMware compró Pivotal y a los pocos días anunciaron, Project Pacific, su re-ingeniería de la plataforma.
Este año tuve la suerte de hacer cursos de vRealize Automation 8 y algo que me llamó la atención es que lo que antes eran servicios, ahora se maneja con pods dentro de los appliances.

Cómo hasta ese entonces no había visto mucho de Kubernetes, más que alguna charla y o algo en la facu, me decidí a investigar y “enseñarme” cómo funcionan.

Me gustaría compartirles este glosario con una descripción para que todos puedan entender que es este servicio que llegó para quedarse.
Al final del post, comparto algunos recursos que me sirvieron para aprender y son 100% gratuitos.

¿Qué es Kubernetes?

Kubernetes es una plataforma Open-Source para administrar y orquestar containers que facilita la configuración declarativa y la automatización.

¿Quién desarrolla Kubernetes?

Kubernetes comenzó como un proyecto de Google y lo hicieron Open-Source en 2014, actualmente lo mantiene Cloud Native Foundation y los mayores vendors de tecnología tienen sus implementaciones. Por ejemplo RedHat con Openshift o VMware con Tanzu, entre otros.

Kubernetes en griego significa timonel, por eso el logo es un timón.

¿Por qué Implementar Kubernetes?

Para responder esta pregunta hay que ir un par de años atrás en el datacenter y entender cuáles son las problemáticas que viene a resolver.

4: Bare Metal, Virtual Machine and Container technology The diierence... |  Download Scientific Diagram


Si nos fijamos en la primera etapa: todos los servidores eran físicos (bare metal), es decir, por cada aplicación que manteníamos necesitábamos tener un servidor con sus recursos (CPU/Memoria/NIC’s/Storage), un sistema operativo y sus aplicaciones:
Este modelo aumentaba los costos de hardware, mantenimiento y era poco resiliente a fallas.
Sumado a esto, la instalación y configuración de servidores bare-metal era (y sigue siendo) un proceso tedioso y lento.

Para resolver ese problema llegó la virtualización:
La virtualización permite colocar múltiples máquinas virtuales (VMs) en un solo servidor físico (Hipervisor) esto permite consolidar recursos (CPU, Memoria, Storage) , acelerar tiempos de aprovisionamiento y da un mayor nivel de seguridad ya que una VM no puede acceder a los recursos de otra VM. Cada VM tiene su propio sistema operativo y aplicaciones.


Containers:
 
Los containers son parecidos a las máquinas virtuales, pero tienen aislamiento flexible, por lo que comparten el sistema operativo entre distintas Apps.  Al igual que las VMs los containers tienen su propio CPU, Memoria, tiempo de procesamiento y demás, pero no dependen de la infraestructura, por lo que son portables.

Adicionalmente, dentro de cada container están resueltas todas las dependencias de una aplicación: es decir si yo necesito instalar LAMP debería tener alguna versión de Linux, Apache, MySQL y PHP.
El container se va a asegurar de que las versiones de Apache, MySQL y PHP sea la misma en cualquier lugar que corra el container. Lo que garantiza la portabilidad.
Por último, los containers fueron concebidos con la agilidad en mente, por lo que la automatización es 100% compatible.
Otra cosa importante, como las Máquinas virtuales tienen el hipervisor los containers tienen el Container Engine. En este caso vamos a hablar de Docker.

En este video dan una explicación muy buena del porqué del nombre containers.

Ahora sí, ¿por qué Kubernetes?
Es sabido que todos los servidores pueden fallar, y nuestro trabajo como profesionales de IT es evitar que fallen. Kubernetes está pensado desde esa premisa, sabiendo que nuestros servicios van a fallar,  nos da la posibilidad de controlar el cómo se va a comportar nuestra infraestructura cuando fallen.

– Balanceo de Cargas nativo: Podemos exponer un container por IP de servicio o DNS. Si el trafico es alto Kubernetes permite balancear la carga.
– Orquestación de storage: Permite automatizar la provisión de storage a tus containers.
– Rollouts y Rollbacks automáticos: Permite definir manifiestos YAML con el estado deseado de nuestros containers.
– Self Healing: Kubernetes reinicia, reemplaza y mata containers en base a su estado.

Kubernetes es la clave para dejar de tratar a nuestros servidores como Mascotas y empezar a tratarlos como ganado.

¿Cómo funciona Kubernetes?

Cuando implementas Kubernetes tenés un cluster.
El cluster es un conjunto de máquinas workers, o nodos,  que va a correr nuestros containers, todos los clusters tienen al menos un nodo. En Kubernetes los nodos ejecutan Pods (que sería un container de containers)
La implementación también tiene un plano de control que supervisa y administra los nodos y los pods.
En entornos productivos, el control cluster tiene varias máquinas master y también múltiples nodos para aumentar la resiliencia del cluster.

Acá dejo un diagrama


Veamos que hace cada componente:

Componentes del Control plane:

Los componentes del control plane toman decisiones sobre los demás nodos de Kubernetes.
Por Ejemplo: definir donde va a correr cada Pod, validar si hay que agregar más replicas, etc.

Estos componentes se instalan en la misma máquina por lo general, y se pueden usar clusters distribuidos como dijimos antes.  En estos servidores no se ejecutan containers de usuario.

kube-apiserver:Se encarga  de exponer la API de Kubernetes, el frontend del control plane de Kubernetes. Todas las interacciones que tengamos con nuestro cluster de Kubernetes van a ser mediante esta api.

etcd:Es la base de datos del cluster de Kubernetes.

kube-scheduler: Indica en que nodo se van a crear los pods.

kube-controller-manager:
Unifica y administra los procesos del cluster de control.
Algunos procesos que administra son:
Node controller: Monitorea el estado de los nodes y notifica si alguno se cae.
Replication Controller: Es el encargado de monitorear y aplicar la cantidad de replicas correctas para cada pod.

cloud-controller-manager: Te permite conectar tu cluster a un proveedor de servicios en la nube (Google Cloud, Amazon, Azure, etc) y separa los componetnes que interactúan con la nube de los que solo interactúan de forma local. Este componente solo existe en la nube, si tenés un entorno on-premise no lo vas a ver.

Componentes de los nodos:

Nota: los nodos tienen que correr sobre alguna distribución de Linux.

Container Engine: El software que se encarga de correr containers, por ejemplo Docker, containerd, podman, etc.

kubelet: Es un agente que corre en cada nodo del cluster y se asegura que los containers estén corriendo en un pod. Está hablando constantemente con el kube-apiserver para validar que los pods y servicios cumplan con el estado deseado. Adicionalmente ejecuta las acciones que le pasa el apiserver.

kube-proxy: es un proxy de red que corre en cada nodo.
Se encarga de mantener las reglas de red en cada nodo. Esas reglas permiten que los pods puedan tener conectividad fuera del nodo.

Pods: es un grupo de uno o más containers, como me explico mi queridísimo Guille Deprati, es un container de containers.

Algo que a mi me sirvió mucho para entender la arquitectura de Kubernetes es compararlo con lo que entiendo y conozco. Cómo soy administrador VMware me sirve hacer la equivalencia entre Kubernetes y vSphere.

Otro recurso importante es el Container Registry:
Basicamente es un repositorio de imagenes de containers (container images) a partir de las cuales vamos a crear nuestras pods.
Existen los Registros Públicos como ser Docker Hub y podemos tener registros privados dentro de nuestra organización (Red Hat Quay, Harbor, etc). Los cloud providers (AWS, Azure, Google Cloud, Alibaba) probeen su servicio de container registry.

Recursos de estudio:

Los recursos que usé durante estos meses fueron los siguientes:

Espero que te haya servido el post, por favor comentame si te gustó o que se puede mejorar.

Saludos